
Recently I saw a number of queries asking about Moving WordPress To A New Host in a few of the forums and Facebook groups that I frequent. Since I am still in the process of moving one of my website to a new host, I might as well document the steps I went through to get it done and share it in here for others to refer to.
How I Moved A WordPress Website To A New Web Host
1. Export The Website Contents into WordPress XML.
At first I thought of moving the entire WordPress DB and folders over. However, I didn’t want to bring along all the other sites (KodeeXII.Net was running WP Multi site) into the new install.
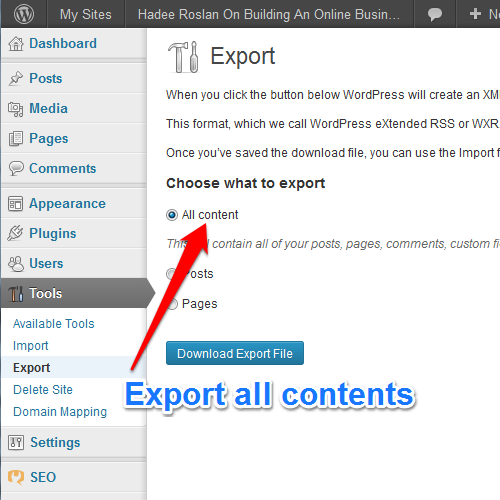
As such, I decided to go the WordPress Export way of moving WordPress. Simple. Export all from the old site. Import all into the new site.
2. Changing DNS Settings.
First thing to do is to remove the site from the list of Addon domains in my BlueHost hosting account. This is easy as there is a tool to do this in CPanel.
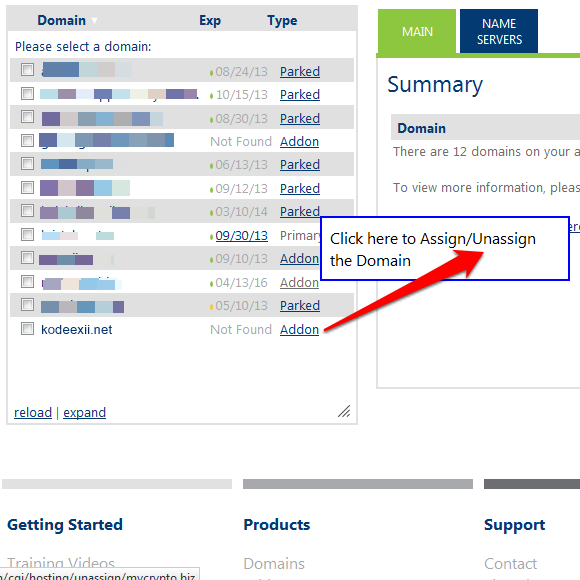
Pretty much click, click, click and it’s gone. After which, next comes the DNS reconfiguration.
Two options. One, I can configure the new hosting’s DNS as the website’s name server. Second, I can configure the website’s A record to point to the webhost server.
To make things easy, I decided to just point the A record to the new hosting server. This allowed me to keep every other DNS settings as they were.
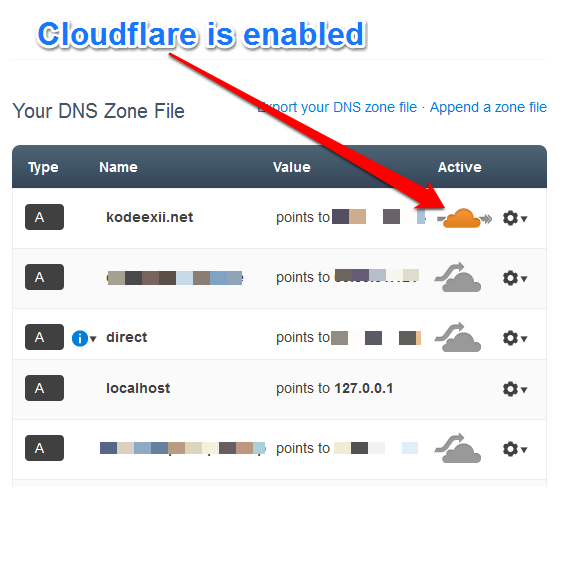
If you want to utilize Cloudflare, then you will have to use Cloudflare as your Name Server and create an A record as I’ve done.
3. Install WordPress + Plugins.
Thanks to Simple Scripts, WordPress installation is just a few clicks away. Among the few must have plugins for all my WP install these days include:
- WordPress SEO by Yoast – This is now my preferred SEO plugin.
- Spam Free WordPress – This has protected me from Spam for many years now.
- Google Plus Authorship – This enables your articles to appear with your Google+ profile photo next to them in Google Search.
- Permalink Finder – This automatically finds the best posts to redirect to for your readers should you have a lot of 404 pages in your site.
- Cloudflare – This integrates your website with the Cloudflare platform. You will need to configure Cloudflare first.
- Child Pages Shortcode – This allows you to display child pages in a fancy way.
- Picasa and Google Plus Express – This allows me to easily pick images stored in my Picasaweb Albums
Following are plugins I use for my Online Business:
- Affiliate Link Cloaking – This allows you to hide your long affiliate links into shorter links using your own domain.
- JomNiaga Ad Manager – This auto-magically create links in your posts to products within JomNiaga.
- WP Affiliate Platform – This allows you to run your own affiliate program.
- WP eStore – This is my preferred shopping cart plugin.
- WP Optins – This makes it easy for you to create Optin pages like this, this and this.
- WP Social Coupons – This is an essential plugin that enables marketers to create viral social coupons like this
- WPFB 2.0 – This plugin enables marketers to build viral Facebook Apps from within WordPress. I use it here.
4. Import WordPress XML.
Before you can import your posts and pages back into the new WordPress host, you will need to install the WordPress Import plugin. I think this feature used to be readily available in WP. It is now, however, a plugin. Once installed, you can then import your data from the WordPress XML you created in step 1.
I also do not want to bring over all the image files from the old WP install. In this installation, I would like to store all images in Google’s PicasaWeb (now Google Photos, I think). So, I did not import images from the old KodeeXII instance. I did, however, copy and zipped the upload folder into my notebook.
I will have to figure out what is the best way to put up all the images into Picasaweb and update the links in my posts. I guess, I will just have to manually update posts that are using images not from Picasaweb. I will do this slowly.
In the meantime, there will be many many posts with broken image links.
Once the import is complete, run a quick verification to see if your posts and pages were indeed imported into the new WordPress.
5. Pick a Theme.
I’ve decided to go with Twenty Twelve Excerpts theme. This is probably just temporary while I test out a few more things and ensure that everything is fine with this new host installation. I will be looking at responsive themes since quite a number of my visitors are using mobile devices.
Yes, if you want to reuse your previous theme, you obviously can do so. Nothing wrong with that. I just want a new look for KodeeXII.Net as well. It’s been running with the old theme for quite a while now.
The Five Steps above are the major steps you need to perform in order to move your WordPress to a new host. Upon completing them, there are probably still a few minor things you still need to do depending on your installation. These include things like:
- Inserting your statistics/analytics code.
- Inserting your ads scripts.
- Inserting your products.
- Creating your affiliate links’ short url.
Oh yes, one last thing to do once you have your site up and running. Take a snapshot of your WordPress site immediately.
Did I miss anything? I’m sure there are more ways to move your WordPress to a new web host. There may even be a plugin that allows you to do this with a few clicks, perhaps. If so, do share them with me and all my readers here.